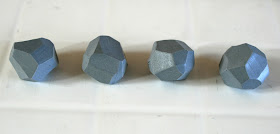
Its always the way, you get an idea in your head but despite looking wonderfully simple the process and technique is anything but!
I wanted to make geometric beads for a necklace, so turning to one of my very first books for polymer clay How to make Polymer Clay Beads by Carol Blackburn, she has a easy, or so I thought tutorial for making geometric clay beads.
Now in Carols book her beads are perfectly geometric, but this technique is not as simple as it seems. I just couldn't get them right, here is my initial process.
 |
| Polymer Clay Beads rolled into squares |
.JPG) |
| Polymer Clay Beads - I sliced away the side of the bead to make them more square with sharper edges |
.JPG) |
| Slicing away - Creating geometric polymer clay beads |
Now heres where it went wrong you need to slice away at the corners to make your geometric beads, needless to say I didn't get a picture of the disastrous final beads, they was just not a uniform shape and in my frustration I kept re rolling and trying again, which took me a good part of the day, I blame my non mathematical brain for this.
So I turned to google, searching for geometric or faceted beads and found two wonderful tutorials on faceted beads.
DIY Glittery Facted Beads by Hazel & Agnes
DIY Geometric Necklace by Alicia on Dismount Creative
So putting aside my need to conform and make the beads uniform I proceeded to try again.
.JPG) |
| Polymer clay beads shaped into squares |
 |
| Faceted polymer clay beads - slicing away at the edges |
 |
| A faceted polymer clay bead |
 |
| My faceted polymer clay beads |
 |
| Grey Faceted Polymer Clay Necklace |
And here is my finished necklace just as I had envisioned, I wanted a simple colour with one bright, bold round bead to compliment and stand out. I used Titanium and Bright Chartreuse from Pantones Fall 2012 colours.
 |
| Grey Faceted Polymer Clay Necklace |
This post is part of Handmade Monday with Handmade Harbour
Resources

I really like the random geometric look and the necklace you have made with them is stunning. The green is a gorgeous colour and the grey shade of the geometric beads is a perfect foil for them.
ReplyDeleteI too like the random geometric look. If you want a perfectly geometric bead then there are machines that make them. Yours are so much more unique and special. The necklace you have made is absolutely stunning. It was worth persevering! :)
ReplyDeleteYou've given me hope! When I started reading I wondered how you were going to achieve this, I find it difficult enough getting a square square, so I was relieved when you settled for the random geometric look. I may be inspired to try this again sometime :)
ReplyDeleteWow, these look really impressive! And very tricky too ;) the green bead works really well :)
ReplyDeleteWow, that's quite a stunning necklace and it was so nice to see your method!
ReplyDeleteThis is something I have never tried, however looking at your photose it looks fun to do as well as producing a beautiful piece, The grey and green really compliment each other.
ReplyDeleteWendy
The freezer tip is great! Love the geo beads.
ReplyDeleteI love the randomenss - but i love them as rounded cubes too!
ReplyDeleteThank you for everyone's positive feedback :)
ReplyDeleteIf it had been me doing that the bead would have got smaller and smaller till there was nothing left! I like how you've done the randomness of the beads and together with the bright green bead makes a lovely necklace.
ReplyDeleteSweetie, you need to remove the links to resources; the first is no good, and the second is downright poisonous! Unfortunately, this is what happens over time. 😰 There’re scripts to periodically check your links; consider looking into ‘em so your readers don’t end up disappointed or worse. Good luck!
ReplyDelete