Showing posts with label Photography. Show all posts

Monday, 20 May 2013

Taking Jewellery Photos

I've been toying around with the idea of taking modelled photographs of my jewellery for a while, wondering  which friends can be bribed with the promise of a bottle of wine or two in return for standing around for a few hours, where to take the photos for the best light? what to wear to show off the jewellery at its best.  With so many questions I usually end up putting my ideas to the side for another day.

But a couple of weeks ago on a rainy weekend I decided to take the leap with my 10 year old as the photographer and me the model, just a bit of fun to see how the photos would turn out.  So with a simple white background and some adjustments to the camera settings Amelie was ready to point and click!

Pre edited photo shots for jewellery
Pre-edited photo shots for jewellery

Above you can see the pre-edited photos, its not that easy this modelling lark trying to ensure the jewellery is being displayed at its best and as can only be expected from a 10 year old Amelie did bore of this photographer business quite quickly with shots of the cat and anything else she could snap in between.

I did however get a couple of shots that where usable from this test and with the help of Picasa 3 managed to edited some shots that I am quite pleased with.


Edited Shots of Jewellery with Picasa 3 by Lottie Of London
Edited Shots of Jewellery with Picasa 3
And a couple of bracelet shots...

Edited Shots of Jewellery with Picasa 3 by Lottie Of London
Edited Shots of Jewellery with Picasa 3
I think the results are quite promising especially with the use of editing within Picasa 3 a free to download photo editing programme.  My next goal is to bribe the old man into taking some shots as Amelie has now tired of a future in photography.

What do you think of modelled photo shots do you think they play an important part in deciding if you want to bu an item of jewellery esp from online?

This post is part of Handmade Monday don't forget to check out more great crafter's over on Handmade Harbours Handmade Monday


Monday, 8 October 2012

Polymer Clay Charm Bracelets - Alice In Wonderland

Well as some of you may know I'm on a little mini break to focus on getting some work done, but I did promise to keep you updated with my work in progress.

But first I would like to say a big thank you to Naomi of MrsMcIndoe for featuring me on her Thursday Showcase last week, you can read my interview here Thursday Showcase.  I met Naomi through Craftblogs Sunday twitter chats #CBUK.  A fellow crafter herself Naomi's passion is paper cutting, please do pop on over to her blog to find out more about her and her wonderful craft.

So I finally got round to putting together my Limited Edition Alice in Wonderland Themed Charm Bracelets.  It took a while deciding on the right combination of pictures for the image transfer on polymer clay but they are finally here.

Alice In Wonderland Charm Bracelet handmade from Polymer Clay
This is my full Alice in Wonderland charm bracelet, featuring five character tiles with the original images from the Lewis Carroll book, antique silver charms and a combination of white and blue glass lamp beads to represent to colours of Alice's famous dress.
Alice In Wonderland Charm Bracelet handmade from Polymer Clay
I have also created a combination of simpler themed bracelets, such as Alice, the Mad Hatters tea party, the White Rabbit and the Queen of Hearts.
The Mad Hatters Tea Party Charm Bracelet handmade from Polymer Clay


The White Rabbit Charm Bracelet handmade from Polymer Clay

Now this is where I need some second opinions, as you may have read in an earlier post Trying To Improve my Product Photos, I have been working on getting my product photos just right.  Alas despite my best efforts and with the tiles being predominately white based, it has been quite a challenge to achieve a perfect white background with my charm bracelets.

I have however tried some adjustments to the photos with Fotofuze.com, here are some examples

The Queen of Hearts Charm Bracelet handmade from Polymer Clay

Alice in Wonderland Charm Bracelet handmade from Polymer Clay

The Mad Hatters Tea Party Charm Bracelet handmade from Polymer Clay
So what do you think, although some images stand out after editing are they lost to the white background?  it would be great to get some second opinions and advice.


Monday, 3 September 2012

The CraftFEST 'I love your blog' blog thing

 
Pass on the Craftfest lurve
This idea was passed on to me by Lu at Handmade in Keswick

This is the Craftfest 'I LOVE Your Blog' Award


I am awarding my 'I Love Your Blog' Award to CraftBlogUK


I discovered CraftBlogUK about a year ago and as a blogger it has become a valuable source of blogging information, hints and tips for helping me to improve my own blogging skills and techniques. 

Want to Share or Return the Love


If you are sent a Craftfest 'I Love Your Blog' Award and you would like to Share The Lurve, then here's how


How To Share The Craftfest Lurve
1. Paste our 'I love Your Blog' Badge to your page
2. Put a on a link to the blogger who sent it you
3. Put a link to the blogger you are awarding the Lurve to
4. List some other blogs you like
5. Inform all the bloggers you have mentioned by commenting on their blogs.
6. List 'How To Share The Craftfest Lurve'
7. Tell us something you'd like to say, or show us something you'd like to sell.

So here are some other blogs I'm in to at the moment


And the thing that I'd like to show you

Polymer Clay Bracelet by Lottie of London

Following on from my earlier post Trying to Improve my Product Photos, I've been working hard on my photos and I'm really pleased with the improvements and results I'm making.

Polymer Clay Bracelet - close up shots


Monday, 20 August 2012

Trying to Improve my Product Photos

Not much has been happening in my world over the summer, last week I was taken out of action after a summer virus finally caught up with me and wiped me out, but I'm better now so I have a lot to catch up on.

During my week of blahhh, I decided I wanted to improve my product photos so that they have a pure white background, I've been currently using a large artist canvas outside in daylight with some photo editing with Picasa 3 to brighten the images.  With the majority of my products this has been working really well and for some images the pictures edges still appear a little greyer than I would like.

Almost perfect - improving product photos - Polymer Clay Necklace

Still a little grey around the edges  - improving product photos - Polymer Clay Charm Bracelet
Still a little grey around the edges  - improving product photos - Polymer Clay Charm Bracelet


Unfortunately with my latest creations I have struggled to capture the pieces at there best, the whiter I make the background, the more I lose detail on the product, they blur into the white background and so I have developed a real bee in my bonnet about getting the photos right and White!.

Far too grey for my liking  - improving product photos - Polymer Clay Necklace
Far too grey for my liking  - improving product photos - Polymer Clay Necklace
I decided to create myself a light-box from cardboard, to use with two lamps I previously purchased from Ikea, to find out how you can do this I have listed some blog post tutorials below.  Sadly for me it did not work well, despite the wonderful help on twitter from @StillerDesigns who explained lots of different ways to try and improve my box and photos.

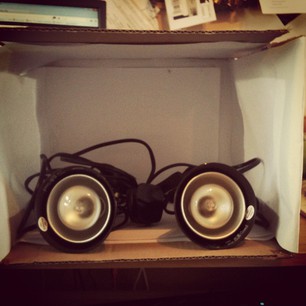
My handmade cardboard light-box - improving product photos

Despite many attempts and much fiddling my photos where either too yellow or too blue, after my lovely husband worked out how to change the white balance on my camera, I thought I had it set but alas it still did not work.  I then decided to go back to trying the canvas with the balance adjusted and trying out taking photos at different times of the day for comparison.

It was at this point, I became very frustrated and found myself hunting down new cameras within the price range of £500, after all a camera at the price has to be good right?

Then late on Saturday night, whilst browsing and catching up with blog posts I discovered one on photography by CraftBlog UK - Craft Photography Tips, its a brilliant post on craft photography and also provides links to more phorotgraphy tips, including Hilary's of CraftBlog UK own posts on the subject.  Hilary herself is a keen photographer and her posts on photographing with a mid range compact camera have really opened my eyes that there is so much more to learn than just pointing and clicking, I obviously have a lot to learn.

My current camera purchase has now been put on hold and I am determined to learn how to use my current camera to the best of its capabilities, to fully grasp and understand the different settings so that if I do purchase a new camera in future I will be fully aware of what I need from it, rather than presuming that the higher the price the better the camera.

Learning how to use my camera to the best of its capabilities - improving product photos
This post is part of Handmade Monday with Handmade Harbour

Resources  
  1. Craft Photography Tips by CraftBlogUK
  2. How to make & use a lightbox to improve your product photography - Handmadeolgy 
  3. How to create an inexpensive photography lightbox - WikiHow
  4. Build a photo lightbox - Wired