Showing posts with label Techniques. Show all posts

Saturday, 21 May 2016

Alcohol Inks on Polymer Clay


Playing with alcohol inks on polymer clay
I have recently expanded on my shop products and added a new line of ring dishes & trinket bowls to compliment my jewellery collection at Lottie of London.

This gave me the chance to dig out the alcohol inks and play around.

Now it had been a long time since I've played with inks and felt like I needed a little testing and refreshing of my techniques before I went gung ho and started making the ring dishes.

Here are some examples of of my test slices playing with colours and different applications, as you can see I had some fun!


Playing with alcohol inks on polymer clay

Playing with alcohol inks on polymer clay

Playing with alcohol inks on polymer clay

Playing with alcohol inks on polymer clay


Well my technique hasn't left me, I'm delighted with these results and they will make for some beautiful ring dishes.


Wednesday, 27 April 2016

Alcohol Marker Pens on Polymer Clay

I purchased some alcohol marker pens by Spectrum Noir last year for trying out on polymer clay.

My theory is that as alcohol inks are usable on polymer clay surely it would be possible to also be able to use the pens with a more controlled colouring effect on clay too. I have only had a chance to have a quick test of the pens but here are some examples of my first mini try out.

I made some small tiles of white clay both raw and cooked to test the pens here are my results.


Testing Alcohol pens on Polymer Clay
Testing Alcohol inks on polymer clay

The above picture is done on raw clay with just the pens.

Below I used the pens as seen in the first photo and then decided to mix it up with some mixing fluid which I thought made it a little on the mucky side.


Testing Alcohol pens on Polymer Clay


Here I played around with some stamped clay.


Testing Alcohol Pens on Polymer Clay

The best result I believe is with cooked clay mainly due to the fact that on raw clay some of the clay does stick to the pens which I believe will ultimately shorten the life of the pens and given their price this wouldn't be a good thing.
The effects are not as great as I hoped but I do plan to test these out some more to see if I can get some different effects.

Until next time!


Lottie Of London Posted using BlogPress from my iPad

Tuesday, 8 September 2015

Polymer Clay Cuff Bracelet - Its a Diaster

Yes its another fail in my pursuit of cuff bracelet making!

The trials and tribulations of making a polymer clay cuff bracelet

This was just a just a test run trying out my new cuff bracelet blank by Premo and although this was just a first ry with the bracelet blank to become familiar with using it I have to admit I had high hopes as the design was starting to look good.


Preparing the design for my polymer clay cuff bracelet

Alas it wasn't to be and I think I know where I went wrong! I just didn't make the base strong enough before applying the pattern.  I made the initial base too thin, cooked it and it was just too weak.

So next time I will know better.

My polymer clay Premo cuff bracelet blank

Blast from the Past read more about my Polymer Clay Cuff Bracelet adventures The Perils of Bangles


Tuesday, 25 August 2015

Polymer Clay Kaleidoscope Cane


Here's some new pendants and earrings I've made from my latest Kaleidoscope cane from my earlier posts a few weeks ago.


Polymer Clay Kaleidoscope Cane - Jewellery brooch & earrings a work in progress

I've also made this bird brooch too along with some smaller stud earrings, they all need finishing now with backs and varnishing.

Below you can see the original canes I made along with the sheet I created.  These canes were the result of a tutorial I purchased from the CraftArtEdu website by Julie Eakes.

Definitely a challenging tutorial but it was so worth it as I'm delighted with the results.


Polymer Clay Kaleidoscope Canes & Sheet

Here's some past blogposts on my Kaleidoscope Canes

CraftArtEdu Review for Polymer Clay Tutorials Part 1

CraftArtEdu Polymer Clay Tutorial Part 2 The Results

My Kalediscope Cane Needs Something More


Sunday, 8 September 2013

Faux Rose Quartz Polymer Clay


Following on from my post on Faux Jade with polymer clay, I decided to have a go at Faux Rose Quartz.

I found this free tutorial online from Polymer Clay Central Faux Rose Quartz, a great tutorial but I altered it slightly here's what I done.

To start I took some translucent clay and added a very small amount of red, I mixed the colour well until evenly mixed.  I them decided much like the faux jade tutorial to take some cuts from my mix and added a few more specks of the red clay, I rolled this through but this time not a thoroughly allowing the mix to have some darker speck of pink showing through.

Mixing for a blend of colour - Faux Rose Quartz with Polymer Clay by Lottie Of London


I then mixed my iridescent glitter though my full mixed rose quartz again until it was evenly mixed through.

Adding iridescent flakes - Faux Rose Quartz with Polymer Clay by Lottie Of London


Then again much like my faux jade tutorial I decided to chopped the two mixes up using my blade and them randomly combined the two together to allow of a variation in colour.

Chopping up your colour mix - Faux Rose Quartz with Polymer Clay by Lottie Of London


This was then rolled until combined, but not overly as I didn't want to colours to blend together and there you go a faux rose quartz polymer clay mix.

Re-blending your colour mix - Faux Rose Quartz with Polymer Clay by Lottie Of London

Now I have to add at this point personally I don't like the finished result of using the iridescent flakes and would omit these next time.


 Here's what I create with my Faux Rose Quartz

Faux Rose Quartz Elephant Pendant made from Polymer Clay by Lottie Of London bespoke jewellery
Faux Rose Quartz Elephant Pendant made from Polymer Clay by Lottie Of London
Faux Rose Quartz Elephant Earrings made from Polymer Clay by Lottie Of London bespoke jewellery
Faux Rose Quartz Elephant Earrings made from Polymer Clay by Lottie Of London


Have a great Monday Everyone and don't forget to check out more great crafter's over on Handmade Harbours Handmade Monday


Sunday, 18 August 2013

Polymer Clay Whats Cooking

This week I've had a sort through my clay canes some have been dispensed of for scrap clay, but I've used some others for my polymer clay ear studs and rings.

Old polymer clay canes resigned to the scrap pile
You may recognise a few already as my millefiori studs and rings are proving quite popular I've had to make more for my Etsy Shop.  Some are new though, well new styles from old canes, once cooked I'll know which ones will work well or not.

Polymer clay focal's for ear studs and rings
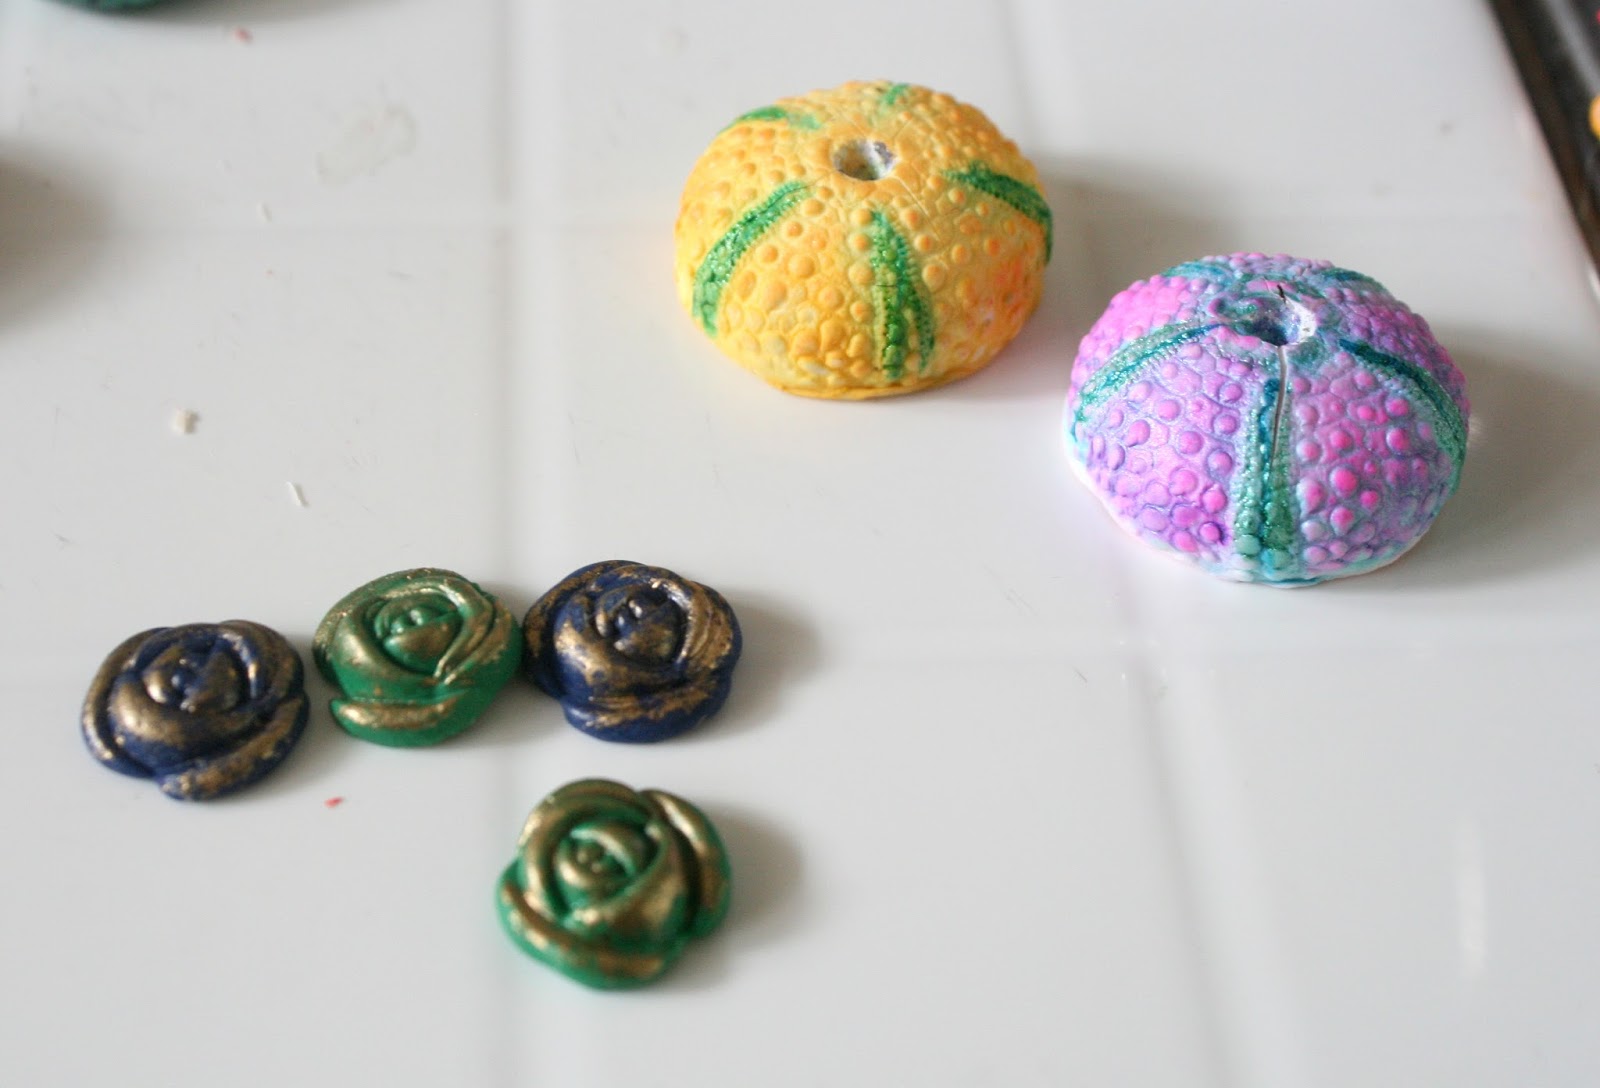
I've also been playing around with some more clay firstly I tried out some rose studs in some alternative colours a dark blue and green brushed with gold, but I'm not entirely happy with these.

I also got my urchin mould in the post this week all the way from Canada as you can see below I had a little practice with them, its a fantastic mould though as usual my alcohol inking technique needs some work I always find my colours come out a bit too intense.


Polymer clay roses and urchins
I'm now awaiting another delivery of crystals to play with some new alcohol inks and more white clay so I should be having a fun week experimenting.

This post is part of Handmade Monday, why not pop on over to Handmade Monday and check out more great crafter's over on Handmade Harbours Handmade Monday

Monday, 5 August 2013

Polymer Clay Mokume Game

In a early post last year I blogged about Mokume Gane with Polymer Clay, well this post is a slightly different variation on the technique.

There is a great YouTube video by Julie Picarello where she shows you how to make some gorgeous pieces and I highly recommend you take a look.

Here is my first attempt using this technique.

Colour selection for polymer clay Mokume Gane stack by Lottie Of London
Colour selection for polymer clay Mokume Gane stack
 I selected my colours for the technique and run them through my pasta machine two at a time to get the desired length, as you can see I combined each darker colour with a lighter colour.


Light on dark polymer clay strips - Mokume Gane by Lottie Of London
Light on dark polymer clay strips

Polymer clay stack for Mokume Gane by Lottie of London
Polymer clay stack for Mokume Gane

 I them combined the four colours again using the pasta machine and cut my long slices to achieve a stack following the dark/light colour combination.


The stack has been indented with a pattern - Moume Gane by Lottie Of London
The stack has been indented with a pattern

Now this is where the technique differs slightly previously my indenting on the stack was more random this time I went for a more structured pattern on the clay.

Mokume Gane slices taken from my polymer clay stack by Lottie of London
Mokume Gane slices taken from my polymer clay stack


Also differing from the last technique when it came to slicing my I clay previously shaved off random slices that where applied to a backing sheet of clay.  This time I cut deeper which left me with four thicker slices of pattered clay to work with and create some pendants from.

Here are my cut pendant shapes ready to be cooked and crafted into some lovely jewellery pieces.


My polymer clay Mokume Gane pendant pieces ready for cooking by Lottie Of London
My polymer clay Mokume Gane pendant pieces ready for cooking

This post is part of Handmade Monday, why not pop on over to Handmade Monday and check out more great crafter's over on Handmade Harbours Handmade Monday


Monday, 13 May 2013

Polymer Clay Lava Beads Tutorial

Here's a simple tutorial for Polymer Clay Lava Beads, perfect if your new to polymer clay and finding your feet with new techniques.

Lava beads are created using polymer clay and sea/rock salt to create a wonderful effect all over the beads resembling lava.

To start all you need is some sea or rock salt, scrap clay and some clay in the chosen colour for your beads.

Polymer Clay Lava Beads Tutorial - Prepare all your items ready to start

My polymer clay beads ready for salt application
 Once you've created your beads using your scrap clay and outer colour layer (above), start applying the sea salt to your beads by either rolling and squishing the salt into your clay or applying the salt to the beads by hand, you will probably find that your beads will lose there desired shape as you apply the salt into the clay as seen below.

 
My Polymer Clay Lava Beads with sea salt applied loses its shape

 Because I want my beads to be round I gently re-rolled them between my palms this helped to embed the sea salt deeper into the beads which creates a deeper effect, it also give you the opportunity to see if you want to apply more salt to any large gaps on the beads.

 
My polymer clay lava beads have been re rolled, embedding the sea salt

Once your happy with your beads its time to create your bead holes and cook them.  Once they are cooked and cooled simply place the beads into a glass of water and leave them to allow the sea salt to dissolve.

My polymer clay lava beads placed in water to dissolve the salt

It does'nt take long for the salt to dissolve so dry your beads off and they will be ready to use, here's how mine turned out below.

My Polymer Clay Lava Beads

This is quite a nice and simple technique which I plan to use for some future designs.

I would also like to take the opportunity to apologise for my photo quality here, unfortunately my camera decided to die on me and I had to use my phone, sorry.

This post is part of Handmade Monday don't forget to check out more great crafter's over on Handmade Harbours Handmade Monday

Monday, 22 April 2013

CraftArtEdu Polymer Clay Tutorial Part 2 The Results

In part one of my CraftArtEdu polymer clay review, I reviewed the tutoiral Have a Heart by Donna Kato as I created and learned how to make the polymer clay cane need to progress onto part 2 of the pendant.


My polymer clay cane for CraftArtEdu's tutorial Have a Heart

If you missed part one you can catch up here


Part two of the tutorial involved the creating of the heart pendant using your kaleidoscope cane created in part one, again I found the tutorial really easy to use and picked up more great tips/techniques on applying my cane to the pendant and creating the heart pendant itself.

So here are the finished results of the tutorial
My Have a Heart Polymer Clay Pendant, created using CraftArtEdu's Tutorial

My Have a Heart Polymer Clay Pendant
My Have a Heart Polymer Clay Pendant, created using CraftArtEdu's Tutorial

And of course I just couldn't stop there, here are a few more pendants I created using the same cane and the tips I learnt from the tutorial.


Black & White Polymer Clay Pendant created with my Kaleidoscope cane
Black & White Polymer Clay Pendant created with my kaleidoscope cane
Black & White Polymer Clay Square Pendant created with my kaleidoscope cane

Black & White Polymer Clay Lariat Necklace created with my kaleidoscope cane

Did you miss my post on digital tutorials here From the Craft Book to the PDF - Online Polymer Clay Tutorials.

This post is part of Handmade Monday don't forget to check out more great crafter's over on Handmade Harbours Handmade Monday


Saturday, 9 March 2013

From the Craft Book to the PDF - Online Polymer Clay Tutorials

It would seem that fiction books are not the only victims of modern technology, craftbooks are also now finding themselves digitalised into PDF's and on-line video content, so much so that very few polymer clay books are now be publishing, personally I find this a shame I love a good craft book for polymer clay and I can endlessy flick through the gorgeous pictures, I always refer to my books for information and when you have a passion for a craft you just can't beat a good book.

Polymer Clay Books
Polymer Clay Books

Of course not every crafter has the means to publish a book and modern technology has therefore opened up not only their world in being able to show there craft but also ours for being able to have a good old nose, this undoubtedly has to be the biggest advantage there is crafting in a digital era.


So what types of digital on-line crafts tutorials are available?

Blogs & Websites - Many bloggers love to post tutorials, tips and advice for there craft and if the blogger is still blogging, you can comment and/or ask any questions you may have.  The same can be said for websites with some tutorials now available from larger company websites such as Sculpey, fan based websites like Polymer Clay Central and magazine tutorials like Make Jewellery though occasionally some magazines will charge a fee for their tutorials.

 YouTube - Anyone can upload a video tutorial these days and YouTube has thousands simply search Polymer clay Tutorials to start,  of course quality will vary but you can find some great gems and new techniques.

Selling Platforms - Quite a few crafters have now made their tutorials available for purchase in downloadable PDF form, you can find these tutorials available on handmade websites such as Etsy or Folksy to name but a few, these are obviuosly avaiable to print off and keep at your own disposable.


A selection of Polymer Clay Tutorial PDF's for sale from Eugena on Etsy


Claylessons.com - Is a website dedicated to clayers, set up to provide a large variety of tutorials for sale from a variety of artists with assorted techniques and skill levels.  Tutorials vary in price and are available for download for you too keep, each tutorial also offers you the ability to ask the creator questions.

CraftArtEdu.com  - A very professional crafters website set up by Donna Kato to offer a unique online crafting experience.  Tutorials are available for a wide selection of crafts from jewellery, polymer clay, fine arts and more.  The classes are in video form and they are quite a bit more expensive than those mentioned above however as mentioned the classes are of a very high standard.

If you know of any more tutorial websites please feel free to add them in my comments below.

Update 11th March 2013
Read my Review of a CraftArtEdu class here CraftArtEdu Review of Polymer Clay Tutorials Part One
and Part 2 here  CraftArtEdu Review The Finished Results Part Two

Sunday, 10 February 2013

Faux Jade Polymer Clay

There are many different Faux techniques for polymer clay and as this years colour of the year is Emerald I've decided to go with the Green Theme and make my first attempt at Faux Jade.

To make faux jade you need to make two different shades of jade one light and one dark.

Faux Jade polymer clay colour mixes

The recipe for each faux jade that I made are as follows -

Dark Jade
1/4" Chocolate x1
1/4" Green x1
1" Translucent x1

Light Jade
1/4" Chocolate x1
1/4" Green x1
1" Translucent x3


I must point out here that I didn't have any green only tropical green, which I think has created a brighter jade.

Next you need to cut up each colour of jade using a ribbon blade, if you don't have a ribbon blade a grater could also be used.

Faux Jade polymer clay cut up using a ribbon blade
Once you've cut up both shades of your faux jade, mix the pieces together and roll flat with a roller, you could cut up this mix again for a more speckled look.  I decided to cut my mix once for the beads created below.
Faux Jade shades combined and rolled

Once you have your faux jade mix you're ready to go and start creating whatever you like.  Here's some beads and elephant charms I created from my mix.

Faux Jade polymer clay beads and charms faux jade tutorial
Faux Jade polymer clay beads and charms


Faux Jade polymer clay elephant charms faux jade tutorial
Faux Jade polymer clay elephant charms


I think maybe using the tropical green has made the beads quite bright and its not so easy to see the colour variations between light and dark in my mix.  I guess that means I'll have to have another go :)

I also found that you can only mix & roller your blend a couple of times before the colours start to blend together and you will lose your colour variation.

Have a great Monday Everyone and don't forget to check out more great crafter's over on Handmade Harbours Handmade Monday

Sunday, 13 January 2013

Polymer Clay Millefiori Rose Canes

Caning is my favorite of the polymer clay techniques, I've had some great results from caning and also its the technique I find the easiest to do.


My plan for this year is to cane more, although I have quite a collection of canes already, as you can see

My Millefiori Polymer Cane Stash

I guess I should also make plans to use some of the ones I have already, but I want to learn more advanced canes like the shape shifting and kaleidoscope canes,

For now though as Valentines Day is just around the corner I have decided to make some more Millefiori Rose Canes, I have quite a few already in pink, blue and lilac but for Valentines I wanted a vibrant red and burgundy.

I first learnt how to make these canes using this tutorial 3D Rose Cane by Sigal Simovich,I really like this cane as I find the finished result always differ slightly.

Building my millefiori rose cane, polymer clay
Building my millefiori rose cane

And here's my finished cane once filled with translucent clay and reduced, I think with the vibrant red I made the cane with the whiter edges along the outside and with the burgundy I done the reverse with the outer edges darker.

Finished Millefiori Rose Cane made from polymer clay in Vibrant Red
Finished Millefiori Rose Cane made from polymer clay in Burgundy shades
Now its time to start planning what to make with my lovely new canes.

Resources including more rose cane tutorials
  1. 3D Rose Cane Tutorial by Sigal Simovich
  2. Rose Cane by Cristalline
  3. TrueLiegh Rose by Leigh Ross
  4. Rosebud Cane by Tami Shvat

This post is part of Handmade Monday with Handmade Harbour why not pop on over for more crafty goodness.