
Tuesday, 31 January 2012
Perfect Pearls & Polymer Clay Part 1
Well originally this was supposed to be about my New Mica Powders which I ordered. I had a de-ja-vu moment aka micro powders and didn't have a clue where to start.
So I decided to blog my experiments and hunt down some tutorials to try them out, but instead I found a tutorial using some perfect pearls and as I have had some sitting around for a year unused I decided to start there.
So here goes I don't have the best colour assortment as you can see but my main aim is to learn new techniques for using them. and applying them to my jewellery.
Starting with the basics I mixed some into clay and applied some to the outside of the bead on both black and white clay.
Here the prefect pearls has been mixed into the clay. The left bead has not been mixed well creating a marbled effect which is something I must test on some larger beads for better viewing. The right bead has been well mixed into the white clay changing the colour, not really an effect that i see worth doing.
Here I have brushed the perfect pearls onto the outside of the bead, using both white and black clay to see how the colour is different, creating a copper/bronze effect.
 Next I took some scrap clay and stamped three tiles. First I applied the perfect pearls again by using a brush and colouring the sections of the stamped clay, can't really say I'm all too keen on this method though with better suited colours a nicer blend could probably be achieved.
 On the second tile I stamped the scrap with perfect medium lightly over the tile and applied just the green to the stamped area and then vigorously brushed off any remaining powder from the tile. The stamped area is very faint, a bit foggy where some powder has stuck to the clay and I like what is ultimately trying to be achieved but I think more tests are need with this method, being to try white and black clay but also a pre-cooked tile of clay as I wonder if the powder would come away so much easier.
 Lastly I added the perfect pearls to some water and created a paint which was applied to the stamped area. Of the three this is my favourite the colours are a beautiful metallic, definitely one for my to do list.
Finally I searched for some tutorials for perfect pearls and decided to have a go at this one here on the Polyform Website Dry Erase Tile Board. Now as jewellery is more my thing and I like to find ways in which techniques can be used to make jewellery, I obviously didn't make the tile, instead I made a sheet of clay using the methods from the tutorial and here are my finished pieces.

So I decided to blog my experiments and hunt down some tutorials to try them out, but instead I found a tutorial using some perfect pearls and as I have had some sitting around for a year unused I decided to start there.
So here goes I don't have the best colour assortment as you can see but my main aim is to learn new techniques for using them. and applying them to my jewellery.
 |
| My perfect pearls |
 |
| Perfect pearls mixed into the clay |
 |
| Perfect pearls applied to the outside of the clay |


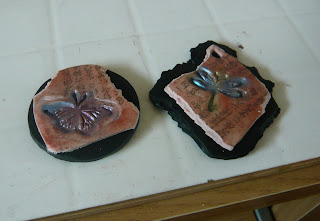
Finally I searched for some tutorials for perfect pearls and decided to have a go at this one here on the Polyform Website Dry Erase Tile Board. Now as jewellery is more my thing and I like to find ways in which techniques can be used to make jewellery, I obviously didn't make the tile, instead I made a sheet of clay using the methods from the tutorial and here are my finished pieces.

I tore the sheets of my clay and applied them to a black background, I am really pleased with the results and I hope to make some lovely pendants from these, The backs have just been applied so now they just need sanding and buffing.

Catch Up
Monday, 30 January 2012
A colour dilemma
I seem to be stuck a bit of a pink and blue colour rut with regards to my current millefiori canes, I seem to have amassed quite a few now and feel the need to expand my colour collection.
So my aim is to create some new colour millefiori canes and even try to experiment with my colour mixes. Here is my first attempt
Yes that is still a hint of a very pale blue but my main aim was to go for a champagne yellow tone and thought that a pale pastel blue would be an interesting colour combination. I like it but how it will reduce I'm not too sure, I didn't want to go too dark on the outer layers but as I have found out before with my canes this can mean they lose definition.
To make this cane I used a free tutorial from Sandie Weatherford - BeadyEyeBrat
Update Here is a sample bead I made, the flower is quite pale with the blue and the veins are barely visible on reduction but I like that its subtle
.JPG)
Sunday, 29 January 2012
Things British
A selection of my bespoke jewellery is now available for sale at Things British, but for those not quite in the know I thought I'd tell you more about this wonderful store especially for UK crafters of handmade items.
Based in Kingly Court on Carnaby Street in the West End, Things British is a new idea to help British designer makers by providing an outlet for them to showcase, promote and sell there items.
The shop is full of wonderfully crafted items ranging from glass, jewellery, ceramics textiles and so much more from a wide range of UK designers from all over the UK not just London, whether full time part time or amateur the store rents shelf space from as little as £2.00 per day. With no commission charges it is a fantastic platform in which to put yourself out there and get yourself and your craft recognised.
If you would like to find out more details about Things British and in particular how you can go about renting a shelf please Click Here.
So as I was saying my jewellery pieces are now available to view and purchase here is my shelf.

My selection is a mixture of pieces including some of my favourite designs but also a new selection of items I have crafted especially for the shop.
Available Now at Things British
 |
| Snowy Owl Themed Charm Bracelet |
 |
| Midnight Tango Ribbon Necklace |
 |
| Loves a Charm, Charm Bracelet |
If you have any questions with regards to my jewellery please feel free to email me.
To follow Things British facebook page Click Here
To follow Things British Blog & News Click Here
To follow Things British facebook page Click Here
To follow Things British Blog & News Click Here
Wednesday, 25 January 2012
Etsy Treasury Feature
My polymer clay Shade of Pink Bracelet has been featured in a lovely Etsy Treasury by Alexandra M
Click view her Treasury Polymer Clay Pink Bracelets
Click view her Treasury Polymer Clay Pink Bracelets
 |
| Shades Of Pink Polymer Clay Bracelet |
Thursday, 19 January 2012
Filling up Shelf Space
I took the plunge and booked a shelf space at the wonderful shop Things British in Carnaby Street in Londons West End, its a fantastic little shop that hires out shelf space for all things handcrafted, unique and special created by crafters from the UK.
I have visited the shop a couple of times now and I could spend hours in there looking at all the lovely pieces from a wide collection of hand crafted items.
So I have been non stop claying, sanding (my poor fingers) and making ready for the items to adorn my self in just over a weeks time.
I have to admit I am both a little nervous and very excited this will be my first time displaying my pieces, but this year I hope to start attending some craft fairs and rent more shelf space.
I have visited the shop a couple of times now and I could spend hours in there looking at all the lovely pieces from a wide collection of hand crafted items.
So I have been non stop claying, sanding (my poor fingers) and making ready for the items to adorn my self in just over a weeks time.
 |
| My Chocolate Candy Charm Bracelet Made for my Things British Shelf |
 |
| Chocolate Candy Charm Bracelet |
 |
| Chocolate Candy Charm Bracelet |
 |
| Planning ideas for my shelf space |
Subscribe to:
Posts (Atom)